
Tip #1 Clipping Paths
K. So I realize it has been over two weeks since I said I would start posting tips in here! :) So I guess I had better live up to my word! ;)
The first tip that I want to talk about is using Clipping Paths. Now this may be fairly obvious to some of you; but for those that have not unleashed the power of the clipping path, well my friend you just do not know what you are missing!!
So what is a clipping path? Technically; A clipping path is a vector path which allows part of an image to show while hiding the rest of the image, effectively rendering part of the image transparent. Say WHAT?
Well, it breaks down like this : )
Let's say you have some word art, and you want to either change it's color, or maybe apply some paper to it. Well, you could just make a brush out of it and then go from there; but.. If you apply a clipping path to it.. Well, the possiblilites are just about endless ;)
MINI TUT TIME:
1. First start by downloading this word art. Open it up in Photoshop, and then chose one of your favorite papers.
2. Next drag your paper over the top of your word art.
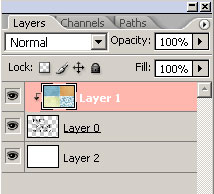
3. Now there are several ways to create a clipping path. (like all things Photoshop!) You can;
Use your keyboard short cuts:
In CS2 = Ctrl+Alt+G
CS or lower = Ctrl + G
Or Hold down your ALT button while you click between the two layers in your layers palette; (When you do this your mouse pointer changes into the little Clipping Path Icon)

You may not realize yet what a cool little trick this is. This is a great way to paint shapes and word art. Load your favorite grungy brushes; create a new layer on top of your shape or word art layer; Create your clipping path and now start painting. Your brushes will only paint inside the path. That is how I created these little rub on images from My Gypsy Rose Kit.

I also used a clipping path to layer paper and paint over this custom shape from my Chelsey's Dream kit to create a collaged effect:

Clipping paths are also a fast and easy way to wrap ribbon. Drag your ribbon on top of the photo or paper you want to wrap; Create a clipping path and Viola; No erasing required ;) Finish your ribbon off with just a little burning; Load a soft edge brush into your Burn tool; change the range to Highlights with the exposure around 20-25 and just lightly burn in some shadow on the egdes.
So play around with Clipping Paths, you will be happy you did! :)
The first tip that I want to talk about is using Clipping Paths. Now this may be fairly obvious to some of you; but for those that have not unleashed the power of the clipping path, well my friend you just do not know what you are missing!!
So what is a clipping path? Technically; A clipping path is a vector path which allows part of an image to show while hiding the rest of the image, effectively rendering part of the image transparent. Say WHAT?
Well, it breaks down like this : )
Let's say you have some word art, and you want to either change it's color, or maybe apply some paper to it. Well, you could just make a brush out of it and then go from there; but.. If you apply a clipping path to it.. Well, the possiblilites are just about endless ;)
MINI TUT TIME:
1. First start by downloading this word art. Open it up in Photoshop, and then chose one of your favorite papers.
2. Next drag your paper over the top of your word art.
3. Now there are several ways to create a clipping path. (like all things Photoshop!) You can;
Use your keyboard short cuts:
In CS2 = Ctrl+Alt+G
CS or lower = Ctrl + G
Or Hold down your ALT button while you click between the two layers in your layers palette; (When you do this your mouse pointer changes into the little Clipping Path Icon)
You may not realize yet what a cool little trick this is. This is a great way to paint shapes and word art. Load your favorite grungy brushes; create a new layer on top of your shape or word art layer; Create your clipping path and now start painting. Your brushes will only paint inside the path. That is how I created these little rub on images from My Gypsy Rose Kit.
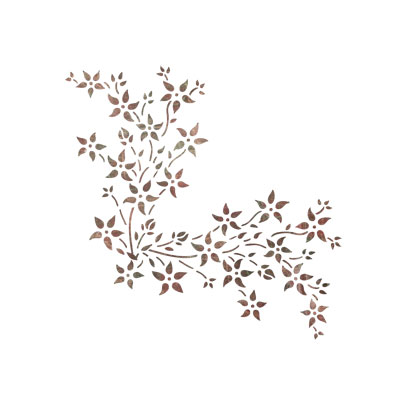
I also used a clipping path to layer paper and paint over this custom shape from my Chelsey's Dream kit to create a collaged effect:

Clipping paths are also a fast and easy way to wrap ribbon. Drag your ribbon on top of the photo or paper you want to wrap; Create a clipping path and Viola; No erasing required ;) Finish your ribbon off with just a little burning; Load a soft edge brush into your Burn tool; change the range to Highlights with the exposure around 20-25 and just lightly burn in some shadow on the egdes.
So play around with Clipping Paths, you will be happy you did! :)
posted by Michelle at 1:52 PM
![]()
25 Comments:
Since I am just learning PSCS2 this is great - I haven't ventured down this path yet! Thanks!
THANK YOU THANK YOU THANK YOU! It is so nice to see tips directed at digi scrappers!!! I can't wait to see MORE!
Oh cool! I didn't know about this blog! I'm a regular on your original blog, but now I'll have to add this one to my "regulars" list. lol Thanks for the cool tip! I'm gonna have to try this! As soon as I think I know a lot about PS, I learn that I've just scratched the surface. :-P
Rischa
COOL! I'm just new with Photoshop and this is an added knowledge. Thanks for sharing this...
THANK YOU!! You have just opened up my Digiscrapping world. I've been "using" Photoshop for about a year now, and have only just begun to explore all of it's tricks.
Can't wait to see more of your tutorials!!
Oh my gosh! I just found your blog from a link from scrapArtist.
I just received Adobe Photoshop Elements 4.0, so your blog will come in handy. Thank you
Thanks Michelle - Although I use PSCS all the time, I never tried this.
Rosalinda
Thanks for sharing, I am wanting to try to use PS more than InDesign (that is what I learned to use at work). Tips like this are just the push I need.
I've used clipping paths somewhat before, but never even thought of the painting part. So definitely some AHA-moments there. Thanks! :-)
Excellet tutorial! Please, please, please post more!!! :)
Thanks so much !!!!!!!! Love to learn all I can- especially from a master like you!Love the word art- thanks! Lisa
wow, thanks for this tip, how easy! I only just upgraded to cs2 and before I couldn't work clipping paths out, now I can do it too, love it :)
Oh this is wonderful! I've been searching for the past couple of months for PS tips geared to digi scrappers/designers. And it is almost impossible to find tips that are a bit more than basic stuff. Thank you so much for starting this! Now I can see myself actually making the switch from paper to digi scrapping.
this is great - didn't know I could do this...thanks!
Love this tip. I use clipping paths all the time. My favorite way to create them is to right click on the top layer in the layers palette and choose "create clipping mask" from the menu. I had never thought about using them over things like text, word art, etc. Brilliant. I've struggled trying to re-color word art in the past and this makes so much more sense. Thanks for the tip!
OMG!! most useful tip I have learned yet!!! thanks sooooooo much for sharing!!!!!
Thank you for this tip.
That is what i am doing now
research.
Not everything in PhotoShop works in PS Elements. However these tricks you've taught us here do. Wahoo! I'm just so darned tickled about it too.
Great tutorial. Thanks so very much for sharing.
This is cool, i will try this. Hope you can share how to make those grungy /washed out papers. Thanks for sharing
OMG -- thank you so much.
I have tried to make sense of other tutorials to do just this and I have never been able to get the effect. This is incredible.
Thank you for sharing your knowledge for us newbies! Your work is amazing, and i am so glad i fell into your blog tonight!
Thank you so much! I'll keep checking back to your website - your tips helped a lot!
I'm learning too and didn't know this trick many thanks it will be very useful for me!
Great tutorial. Keep coming these kind tutorials. Thanks.
thank you very much for a very nice tutorial you have given.
I learned lot of techniques and tricks that i can use on my project.
tnx for the knowledge,..geezzz:)
Good tips.
Keep posting.
Very useful post.
Thanks for sharing.
Regards,
clipping path
Post a Comment
<< Home